Wednesday, June 30, 2010

Pretty {Thrift} Decor

I have found some good stuff on my recent trips to the thrift store. I am loving the color scheme of all of my new items as they go so well together. I can't wait to start redecorating some spaces in my house with all of my new pretty decor.


Here is a description of the items from left to right:

-A small black and silver picture frame {my favorite colors} for 99 cents

-A medium sized white container from Edible Arrangements for $3.99

-Another, smaller white container from Edible Arrangements for $1.50

-A small green container from Pier One for 69 cents {the best bargain}

-Three small terra cotta pots for $1.99

-A small light green gravy dish for $1.99

Total spent = $12


~Momma to Bug n' Bear~

Monday, June 28, 2010

Chalkboard {Frame} Art

Making chalkboards is definitely one of the easiest do-it-yourself projects. I have made a few and have plans to make another one soon as well as do some chalkboard labeling on various containers. One of my favorite chalkboard projects so far was created by using set of three square picture frames, two small and one large, that I found at Salvation Army for $1 each.

Here is the larger one that is currently hanging above my coat rack in the entryway:


Here are the two smaller ones that are hanging in my half bathroom:


To start making them I removed the backing insert from the frame and sprayed the frames with chalkboard paint. Then I cut fabric squares larger than the backing and attached them to the backing with Elmer's Spray Adhesive. I wrapped the excess fabric around the other side of the backing and placed it back in the frame. Next I hot glued various shells directly to the fabric. Last but not least I wrote beach themed words and messages around the frames.


The possibilities for these frames are endless and I can easily change them at any time. I thought about attaching some silver clips and creating a message board and still might try it if I get tired of the shells. If anyone else tries this I'd love to see what you come up with!

All Linked Up:

Today's Creative Blog...Get Your Craft on Tuesday

Nikki's Nifty Knacks...Gettin' Crafty on Hump Day

The Shabby Chic Cottage...Transformation Thursdays

The Shabby Nest...Frugal Friday

A Soft Place to Land...DIY Day Beach Edition

Visit thecsiproject.com

~Momma to Bug n' Bear~

Thursday, June 24, 2010

{embrace} the camera

Averi at 7 months

With Momma:


With Daddy:


With Sister:


~Momma to Bug n' Bear~

Monday, June 21, 2010

Personalized {Subway} Sign

I've been seeing homemade subway signs all over the place recently {you can see some of my inspiration here}. I love the way they look and really wanted to make one for myself but I wasn't thrilled about spending a lot of time stenciling and painting for a couple of reasons. One, I don't have a lot of free time and two, I don't have a steady hand.

So Zak and I brainstormed on how we could create one electronically and pay to have it printed. Fortunately, Tee, Zak's Dad is a graphic art designer with his own business called "First Impressions" so he helped us out using Adobe Illustrator {I created my version in Microsoft Word and sent it to him to convert}. We took the file to Kinkos and had it printed on heavy weight paper for a total cost of $23.

The size 16x20 was determined by a frame that I found at Goodwill for $3. It is a very basic wood frame that was originally painted dark blue. I sanded it down and spray painted it with Rustoleum Aluminum.


It turned out to look like more of a modern piece of art as opposed to a vintage sign but I really like the simplicity of it. Each of the street names are symbolic to Zak and I and that is my favorite thing about it!


Total Cost = $30


All Linked Up:

Tatertots and Jello...Subway Art Party

Today's Creative Blog...Get Your Craft On Tuesday

Just A Girl...Show and Share Wednesday

The Shabby Chic Cottage...Transformation Thursday

Visit thecsiproject.com


~Momma to Bug n' Bear~

Sunday, June 20, 2010

Free {Tray} Makeover & Asiatic Lillies

I found this wooden tray in a pile of free stuff that somebody had after their yard sale. After a good sanding down and three coats of my good old standby spray paint {Rustoleum Heirloom White} it looks brand new. The Asiatic Lillies came from my garden. Arielle tried to pick one and ending up breaking all of them off the stem. They look better in this glass pot that I got from Goodwill so it was a happy accident!


BEFORE {after removing sports embellishments and sanding}:


AFTER:


I'm thinking about turning it into a craft tray for Arielle using buckets from Target dollar section or reusing miscellaneous containers. I have seen some cute homemade labels in blogland that I can easily replicate. Perhaps a little stenciling and girly embellishment on the sides would complete this free wooden tray makeover. Stay tuned!
All Linked Up:
The Shabby Nest...Frugal Friday
~Momma to Bug n' Bear~

Thursday, June 17, 2010

Giveaway!

Check out this awesome giveaway that Decor Chick is doing! Who couldn't use a $50 gift card to Hobby Lobby. You get 3 chances to win. Good luck!

While you are there check out her blog. I know you'll like it!

~Momma to Bug n' Bear~

Wednesday, June 16, 2010

Subway Sign {Art} Inspiration

I'm working on a new wall art project that was inspired by Carrie at Buzzings of a Queen Bee. You can check out her homemade subway sign tutorial here and see a picture below:


I love her idea of a personalized subway sign and knew I wanted to make one for myself. The problem is that I don't have a steady enough hand to do stencils and fill them in with a paint pen. I just know I would end up messing it up somehow so Zak and I have been trying to think of alternative ways to make our own. I think we have found a solution that works for us but I can't bring it to fruition until I find the right frame. I am certain that if I can find time to stop at Goodwill that I will find one and hopefully finish my project by this weekend.

Meanwhile, here are some other inspiring subway signs that I had in mind when designing my own:


Photo {and tutorial} courtesty of http://www.lilblueboo.blogspot.com/
Cost: Not specified


Photo {and tutorial} courtesy of http://www.younghouselove.com/
Cost: $6


Photo courtesy of http://www.restorationhardware.com/
Cost: $795

~Momma to Bug n' Bear~

Monday, June 14, 2010

Laundry Room Makeover & {Storage} Tips

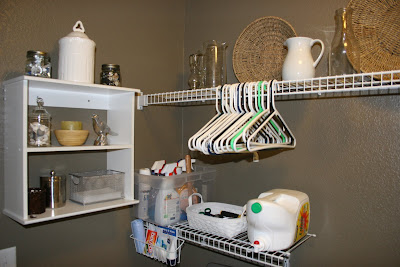
I have {nearly} completed our laundry room makeover. Aside from hanging a couple of things up on the wall {more about that later} there is not much else I can do to finish this space. The room is actually a large hallway closet and it is small. I didn't change much from the previous layout other than painting the walls, adding accessories & storage and rearranging some stuff on the walls that was already in there. This room now has plenty of storage for everyday household items such as cleaning supplies, sewing notions, hardware and tools. If you take a close look you'll see storage containers just about everywhere in all shapes and sizes, some of which are pretty and some are plain but either way they serve their purpose. Everything I used I already had except the paint so the total cost was about $25.

The paint color is called "Mocha Accent" by Behr. I wouldn't recommend using it in an entire room because it is rather dark but that is the look I wanted for our laundry room. I figured since it really is a closet and closets are usually dark I wanted it to stay that way to some degree and not stick out of our house like a sore thumb. All of the white from the appliances to the shelving really tones down the darkness as well which I was counting on.

Here are a couple of before pictures of the laundry room without appliances:


Here are the after photos and a breakdown the changes that I made.

The new washer and dryer, although with increased capacity from our old ones, are much smaller so I was able to fit a 3 drawer organizer on the floor next to the dryer. This is great for additional storage of large items such as humidifier filters which is what I have in there right now. On top of that I found a large, heavy duty wire basket at Goodwill for a whopping one dollar and I loaded it up with toilet paper rolls. We buy these from Costco so we get a million at a time {too many to fit all under the bathroom cabinets}.


I rehung my little white shelf on the other side of the room where there was additional space. On top of it I added two cute, little matching mason jars; one holds screws & nails the other holds buttons. Between those is a beautiful white jar that contains various light bulbs. The shelf below that contains some pretty accessories for now until I need additional storage. The bottom shelf holds a silver, metal mesh container with dryer sheets, a brown beaded candler holder with chalk and a shiny silver container with random hardware. I might hang a hook rack below this shelving unit if I find I need to hang stuff up but for now I don't have a use for one. It's good to know that there is ways to add different kinds of storage if need be.


I filled up the white wire shelving that runs the entire width of the room with a combination of glass and white accessories as well as round shallow baskets resting against the wall. I also added two photo boxes filled with sewing supplies that fit perfectly in the corner. Although this type of shelving isn't very eye-catching I opted to keep it instead of replacing it because it was no cost and I need it to hang clothes that are drying. At some point I may purchase or make my own wood shelving and hang a curtain or shower rod but right now this was much more feasible for now.


The shorter white wire shelf above the dryer contains a plastic bin that holds lots of cleaning supplies. Again, not very pretty but functional and I know the items are out of reach of little hands which was my goal. Storing these items here is a good thing because it means I don't have to store them under bathroom cabinets and bother with childproofing them. I have been looking for something else to use instead of a clear plastic container like a basket or colorful tote but so far no luck. I use these 19 quart clear plastic containers everywhere in my house because they are so versatile and cheap {$4 at Wal-Mart}. I use them to store seasonal items, baby stuff, kids cups, cleaning supplies, blankets, undergarments...you name it and they'll hold it and fit practically anywhere! This shelf also contains a basket with basic tools that are mostly used for hanging stuff. I already had this basket and it was not being used so at some point I may swap it out if I find one that is more suitable for the space and function. And of course this is where I keep the large container of laundry detergent {also purchased from Costco which explains why it is so big}. I love the idea of storing powder laundry detergent in glass jars but I have always preferred liquid detergent so no such luck!


On top of the dryer I put a small plastic container to put things in that I find when I am doing the laundry. This keeps these items from rolling onto the floor before I have a chance to put them where they really belong. I also have a round glass candle holder sitting under the laundry detergent dispenser which is also where I put my soap cup so there is no mess to clean up. I also have a plastic mat covering the top of the dryer to avoid dings and scratches.


The hanging iron and ironing board organizer serves its purpose as well and I'm glad I was able to put it where the board can rest between the wall and the washer so it's out of the way. Before we hung it up there were did a test run to make sure I could get it in and out of the closet.

I am going to make a chalkboard to hang in this space so I can make notes or leave messages. I think a chalkboard hanging by a ribbon from a silver decorative knob would look great! I will also hang my clock as soon as I decide where the chalkboard will go.

For now the space is a big improvement from before and I am happy that this project fell into my lap, even if we did have to buy brand new appliances! If only I could find a way to organize my kitchen and pantry this well.

All Linked Up:
Today's Creative Blog...Get Your Craft on Tuesday
Just A Girl...Show and Share Day
The Shabby Chic Cottage...Transformation Thursday
Just Alice...Laundry Room Party
Organize and Decorate Everything...We're Organized Wednesday

~Momma to Bug n' Bear~

Thursday, June 10, 2010

{embrace} the camera

I thought I would join in on this linky party over at 3 boys and a little lady especially since I had some recent pics to share! Arielle is becoming quite the photographer.


This next one doesn't count since I took it but I thought it was too cute not to share! And I am too lazy to edit the red eye.


~Momma to Bug n' Bear~

Laundry {Closet} Before

I was really hoping to finish up the laundry room makeover that we started this weekend but no suck luck! I am waiting on Zak to cut another shelf for me but he is so picky that he needs to go back to the store to buy a different shelf that matches our existing one. Talk about perfectionist! Meanwhile I have been trying to decorate and organize it using stuff I already have but I may have to to buy a few things this weekend. Here are some pictures of our empty laundry room so you can try to envision the makeover. We painted it "Mocha Accent" by Behr so bye-bye beige! I chose a dark color because of the fact that our laundry room is actually a large closet in our upstairs hallway so I didn't want it to stand out too much. The darkness makes it feel more like a hidden place which is what I wanted.


Yesterday Averi had a little stomach bug so that was interesting. She ran a fever all day and pretty much slept for 24 hours. I was relieved when she was acting more like herself this morning especially since Arielle had been sick over the weekend with another ear infection and I have been battling an extreme case of hives. Hopefully we'll all feel better this weekend and have lots of time to play and finish projects!


~Momma to Bug n' Bear~

Sunday, June 6, 2010

June To Do List

Another month has flown by and I am happy to report that I accomplished 3 out of 4 of the things on my To Do List for May. This weekend we had an unexpected project pop up and I can't wait until we are finished so I can post it. It was all made possible because last weekend our four year old washing machine died on us. We had a repair man assess the damage and were shocked when he told us it was going to cost over $650 to fix it because we paid a lot less than that to buy it. Needless to say we decided to buy a new washer and got a great deal on the matching dryer. We were so pleased to find out that our city and state each have seperate rebates available with the purchase of enery efficient appliances. We'll also be receiving a rebate from GE for purchasing both appliances. Did you also know that Lowe's offer next day FREE delivery? This was a lifesaver!

Anyway, I decided to paint the laundry room {closet} the night before our new appliances were delivered. So that is the project that I can't wait to finish up.

Here is my To Do List for June:
1. Finish newly painted laundry room.
2. Buy/make new accessories for ladder shelves in office and redecorate them.
3. Buy/make new curtains for the patio doors in the kitchen.


There are so many more projects I want to do but I have to consider how much time I actually have to work on them so I like to keep my goals small and realistic.

It wouldn't be a good post without pics so here is a wonderful large blue mason jar that I found at Goodwill the other day. I love it! I'm not exactly sure where I am going to use it but for now it is resting on one of the office ladder bookshelves.


~Momma to Bug n' Bear~

Friday, June 4, 2010

Averi ~ 8 months

In the past month Averi has started doing so much and she has settled into a great routine!

-Rolling from her tummy to her back
-Rolling across the floor to get to something
-Getting down on the floor from a sitting position (more like falling down but intentionally)
-Sleeping through the night
-Weaned off nursing
-Eating solid foods (by far her favorite thing to do)
-Three meals a day plus afternoon snack
-Four 6 ounce bottles a day; 6am, 12pm, 4pm, 7:30pm (bedtime)
-Drinking from a sippy cup
-First tooth
-Size 3 diaper
-Practically outgrown size 9 month clothing
-Out of infant carrier into rear-facing car seat
-Lots of laughing, babbling and smiling!

I have had so many people tell me what a Happy and Pleasant baby she is and I couldn't agree more! We are so blessed to have her in our family.


Here is a video of Averi that I took one day when she was eating mac n' cheese. She is just too cute for words!


~Momma to Bug n' Bear~

Wednesday, June 2, 2010

Wooden {Lamp} Makeover

I purchased this wooden lamp base at a thrift store for $1 knowing that it had so much potential to look beautiful. Even if I brought the lamp home and it didn't work it was worth a try for this amount of money. I do have to admit that I was relieved when I plugged it in and the light came on though.


I decided to use Rustoleum Heirloom White spray paint for my color mostly because I already had some on hand but I did have to purchase an additional can so I spent another $4. After four coats of paint over the entire base the lamp already looked ten times better than before. However, because it is made of wood and there were a few cracks and knicks it didn't look very fresh and clean like I was imagining. I was ready to sand it down and give it a couple more coats of paint but the distressed look appealed to me more so I just sanded as much as I could.


I really love this new lamp that I created and it looks even better with the burlap lamp shade on it that I purchased from Target for $20. I thought about covering my own lamp shade but I would have chosen burlap anyway so this pre-made shade was perfect!

This lamp has made an excellent addition to our Beach Guest Room! I have a side table in this room that I have decided to finish in the same way so it will match the lamp and balance out the room. I'm putting that on my To Do List for June!


All Linked Up:
Today's Creative Blog...Get Your Craft on Tuesday
Just A Girl...Show and Share Day
The Shabby Nest...Frugal Friday
Visit thecsiproject.com
~Momma to Bug n' Bear~

Tuesday, June 1, 2010

Our {Girly} Playroom

About a year after we moved into our house we decided to have a portion of the basement finished so that we could use it as a playroom. Although this room doesn't get used nearly enough as you would think or I would like it has so many benefits. Like for starters, it holds a LOT of toys and it is nice and cool in the summertime. Maybe once Arielle gets a little more independant she will appreciate it more. I know Averi is going to have a blast in there as soon as she starts crawling....everything will be on the ground!

I arranged the pictures down below in order of how you would see the room if you were standing in the center and spun around in a clockwise direction. There is a fully slipcovered loveseat in the middle of the room that I purchased on craigslist for $150. It was the best investment for this room by far! The double doors open up to the rest of our unfinished basement which contains some exercise equipment and provides plenty of storage for seasonal items, unused furniture and other items of that nature. The rest of the room speaks for itself!


~Momma to Bug n' Bear~