Showing posts with label Home Improvement. Show all posts

Wednesday, May 11, 2016

Sliding {Office} Door

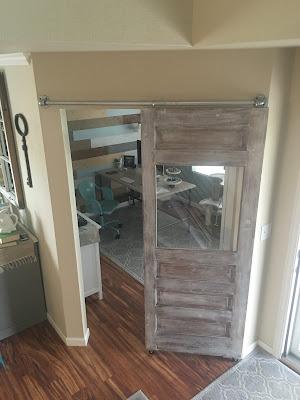
I'm excited to share my latest project...a sliding "barn" door for our office!  I have been wanting a barn door in our house for quite some time but couldn't think of anywhere that one would work until recently.  The opening to our office, which is just off the front of the house, was (close to) perfect!  The hunt began and I quickly found an antique hardwood door on CL and refinished it with a whitewash method. 

Here is the what the door looked like originally (I ended up spending $40 so it was a great deal):


I decided to hang it up using galvanized pipes since I already have curtains hanging from the same pipes in our dining nook and sitting room.  Here is the office entry before we hung the door:


The opening isn't huge and didn't need a door but like I said, I've been dreaming of a barn door so why not, right?

Here is the door after we hung it up:


I don't plan on ever needing to slide the door but we can if need be.  The nice thing is that it "locks" in place when pushed over to the side as the eye hook settles perfectly between the elbow and pipe.  This to me makes it safer around kids.  Also, we replaced the original glass window with plexi-glass because it unexpectedly broke when our cat decided to investigate the new door leaning in the entry way right after we brought it home.  Oh well!  Plexi-glass is a safer alternative anyway.

I think I'm going to make a sign to hang above the big empty space over the door.  For now, I'm enjoying seeing my new barn door every time I come down the stairs!


Tuesday, April 19, 2016

New {Iron} Stair Railing

We took the plunge and replaced our wooden stair banister and railing with a black iron one!  The result is beautiful...better than I imagined! 

Here is a before photo of our old wooden banister that we painted white:


It wasn't that the white didn't look good, it just didn't function well for our house.  It showed dirt terribly and got scuffed and scratched a lot.  I've been seeing a lot of metal railings on home makeovers and knew it was the perfect solution for us. 

In order to save about $600 we opted to do the demo and replace the base board ourselves.  We purchased a couple of 16', 1"x6" boards of primed of MDF since this material is harder than solid wood and won't dent as easily.  We purchased them from a local lumber supplier who delivered them for free. The fact that it was primed help cut the painting time in half too!

Here are a couple of photos from demo day:


Here is the new, painted base board that we installed ourselves:


Colorado got hit with a snow storm the day that they were supposed to install our new railing so it got delayed by a few days.  We had some dressers lining the upstairs so there were no accidents, thank goodness!

The installation only took an hour or so and everything went smooth as expected.  Here is what it looks like now:


I highly recommend Colorado Custom Iron Works if you're looking to replace your stair railing!


Friday, January 29, 2016

Shiplap {Fireplace} Wall

I am happy to announce that I have shiplap in my house!  In addition to adding planks to our fireplace wall, we also planked over our fireplace cubby.  I was sad to loose all the decorating space but the leaving the drywall fireplace surround with planked walls on either side would have been a decorating crime.  I love how it turned out and can't wait to finish decorating the wall.

Here is a before shot of the fireplace wall.  The dark blue was pretty but made the space feel dark all the time even with the sun shining in.


First we painted the entire wall white so you couldn't see the blue behind the planks:


Then we hung our planks.  We purchased five 4' x 8' flooring underlayment sheets at Home Depot for $12 each and had the store cut our boards down to 7" strips.  The walls on each side of the fireplace was about 6' wide so we had some waste on each board which I will later use to make signs!  This picture is before we added planks above the fireplace:


See what I mean about a decorating crime by leaving it this way?  Much better with the planks covering the drywall cubby as you can see here:


Ahh....beauty to my eyes!  Next I painted all the planks and molding strips White Whisper by Glidden (same color as our existing fireplace surround, crown molding and baseboards).  In case you're wondering, I painted the sides of the boards as much as I could without doing them one by one, before we hung them on the wall.  This is was time well spent because the gaps between planks, spaced by nickels, are very much visible.

This picture was taken at night:


And this one was taken during the day:


Stay tuned for the decorated wall and some other living room updates!


Wednesday, August 11, 2010

Playroom {Craft} Area & Storage

Finding motivation this summer has been a little difficult and I haven't accomplished much in the way of decorating projects. So it makes me very happy that the playroom shelves are finished and we have a new craft table for Arielle. Looking at the pictures that I took of the shelves made me realize how badly I need to decorate the playroom, especially the new "craft section". I feel as though I am working with a blank canvas and have a ton of ideas floating through my head for all of this empty wall and shelf space.

Here is a BEFORE picture of the area in our playroom before we built the shelves:


Here is the after pictures with new shelves and craft table:


The fabric bins are concealing a lot of craft supplies and are perfect for the shelves because they have handles that will make it easier for Arielle to get them down. Since the shelf that they are on is a bit taller than her and she can't see inside them I am going to put some labels on the bins. It's so nice to be able to do that now that she is reading like a pro! I think I am going to steal JAG's idea so they should look similar to this when I am done {in fact I am going to email her right now to find out where she buys those circle things to make the labels}.


We purchased the table on craigslist for $35 and cut the legs down to a reasonable height for Arielle, keeping in mind that she is growing like a weed! I would love to paint the table white but I know it's going to get dirty so I don't think that would be a good time investment. I didn't intend to use the toy box bench as seating but since we decided to keep the table on the taller side our existing chairs a bit too short as you can see from the picture. The bench ended up being the perfect height and it provides additional storage, it just takes up a bigger footprint on the floor than regular chairs.


Here is a list of the supplies that we purchased to make the shelves including costs:

-3 six foot long primed MDF boards ($10 each)

-5 sets of two decorative metal brackets ($10.50 each)

-1 quart of Behr "February Frost" {purple} paint ($12)


In retrospect we could have saved money by purchasing a sample size of the purple paint but hopefully we can find a use for the leftovers and since we already had the pink paint that saved us a little. The total spent for three 5 foot shelves was about $95.

Check out this cute dry erase board that I got at a garage sale for $5! We hung it up in the playroom this weekend next to Arielle's kitchen playset {which she has totally outgrown} and she wrote this sign:


All Linked Up:

Today's Creative Blog...Get Your Craft on Tuesdays
The Shabby Chic Cottage...Transformation Thursdays
The Shabby Nest...Frugal Friday
Organize & Decorate Everything...We're Organized Wednesdays

~Momma to Bug n' Bear~

Friday, May 28, 2010

Front Porch done at last!


I was loving the changes that we made to our front porch door and lights so much that it made the rest of our front porch items in need of a makeover as well. For example, look at the BEFORE photos below and note how my favorite brown flower pots no longer matched the door. Also, the black metal plant stand and wooden bench were so faded that they were hardly noticeable. So we purchased a few more cans of spray paint and instantly transformed the rest of our front porch into a refreshed and renewed space.

BEFORE #1:


BEFORE #2:


I purchased two cans of Rustoleum Heirloom White spray paint to transform the flower pots. It took three coats to fully cover them but it was worth the time and money. I really like the lighter shade on them now but they are kind of boring so I think I will add a monogram or decal to them soon. I might have considered buying new pots if I hadn't already planted flowers in the old ones but it would have cost me at least $60 if not more for new ones and all Ihad to spend was $10 on spray paint to makeover my old ones. That's quite a savings!

AFTER #1:

AFTER #2:

Zak took apart the bench and spray painted the metal sides and the plant stand with Rustoleum Semi-gloss Black. I love how the black metal stands out against the brick walls now. He also sanded down the wooden bench slats and restained them in a red finish. The bench looks so much better now than it did before. We could have bought a new bench for around $100 but I think spending $8 for spray paint and using leftover stain was a much more affordable way to improve our front porch. We bought this bench a little over 7 years ago when we bought our first house so it has a lot of meaning and I wouldn't have wanted to get rid of it anyway.

AFTER #3:


I was thinking about replacing our existing address numbers which currently reside on the left column {you can't see them in the photos because I cropped them out for obvious privacy reasons}. They are the standard black letters that you see at most homes so I want to change them to something that will stand out more. However, each number costs $5-6 and we have 5 numbers in our address so that's a big chunk of change. I also think it would look better for them to go across the top of the porch instead of going down the side of the column so perhaps a hand-painted plaque would be a better option.
Does anyone have a more affordable suggestion for how to do this improvement? If so, I would love to hear from you.
All Linked Up:
The Shabby Nest...Frugal Friday

~Momma to Bug n' Bear~

Tuesday, May 18, 2010

Front Porch Improvements

Last weekend we got one more thing on my to do list accomplished! We painted the front door and the porch lights. Before our door was a darker shade of green than our house and it didn't stand out enough. We decided to use the same black paint from this post from one of my favorite bloggers. I love how the black pops out against the white trim!


Our front porch lights used to be black but they faded over time and were really dirty inside and out. Zak took them apart and washed them then we gave them two coats of metallic satin nickel spray paint. They now look brand new and compliment the black door nicely!


I'm not loving the ugly old milkbox in this picture! If only I could paint that too.

All linked up:

Today's Creative Blog...Get Your Craft on Tuesday

~Momma to Bug n' Bear~

Monday, May 10, 2010

Master Bathroom Improvement

I was so happy with how our framed bathroom mirrors turned out that I have been looking for more ways to improve the look of our bathrooms. I finally got tired of looking at the side of our ugly plastic tub in the master bathroom so we decided to update it with beadboard siding and trim. It was actually quite easy and relatively inexpensive to do. Zak used "pre-made" wainscoting boxes sold at Home Depot which cost a fair amount more than buying the beadboard and trim seperately, however, for as little space as we needed to cover it was worth the cost difference. Plus, we used these packages to do our two other small bathrooms in the house and knew the time saving was worth the extra money.


Here is the {ugly} before of our master bathroom tub:


And here is the {beautiful} after:


The first step was to build a frame out of 2"x3" wood {in retrospect we would have used 2"x4" so the beadboard had more surface to adhere to but fortunately it wasn't an issue for us}. Once your frame is put together you adhere the newly built frame to as many surfaces as you can {floor, wall, tub, etc..} with liquid nails.


Once the frame is secured in place, you attach the beadboarding and trim to the frame using liquid nails and a nail gun. Fill in cracks and nails with quick dry putty and sand down for a smooth finish. Now you are ready to paint! Since the "pre-made" boxes that we purchased are already white, we only had to do two coats of paint.


Let the paint dry then attach edging tiles along the top of the frame using liquid nails. Another option is to use cut marble tiles that overhang the edge but we picked the easier and less inexpensive option. We found white matte corner tiles on clearance at Lowe's for twenty-four cents each so that reinforced our decision. We had to take two of the tiles to Home Depot to be cut {free of charge}. To determine the cuts, start placing tiles in the center and work your way out. The two end tiles are the ones that should be cut exactly the same size. This looks better than just cutting one tile and it's definitely worth the trip back out to the store!


Lastly, you can use "Grout Caulk" to fill in the gaps of the tile. This is so much easier and a lot more affordable to do than regular grout which also requires sealer. Use regular silicone caulk to fill in all of the seams on the beadboard and trim so that water does not seep through and turn moldy. We still haven't applied any water-sealer to the siding yet but we'll do that soon because we know the side of the tub is going to get wet and this will prevent it from warping and mildewing.


Total spent on this project was about $45 give or take a few dollars. I love the new look of our tub and can't wait to see what other improvements we can do soon!


All linked up:

A Soft Place to Land...DIY Day with The Pleated Poppy
Just A Girl...Show and Share Day
The Shabby Nest...Frugal Friday

~Momma to Bug n' Bear~


Tuesday, May 4, 2010

Framed Bathroom Mirrors Project

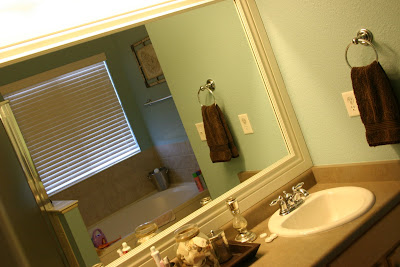
I have been seeing a lot of framed mirrors in blog land lately but this one was the inspiration that I needed to finally do it myself {with a LOT of help from my handy husband}. We started with our master bathroom mirror and selected a four inch wide trim to frame it out. We followed Shelley's tutorial except we decided not to add quarter round. The frame was fairly easy to make but it would have been easier if the existing mirror and walls were perfectly square. Total spent was about $50 and it was worth every penny!


I can't believe I forgot to take the contact lense case before I took the pictures!


We like how the master bathroom mirror turned out so much that we did one in our girls bathroom too! For their bathroom we selected a three inch trim since their mirror is much smaller. The hardest part about this was getting the frame to stay together with less surface for the liquid nails to stick to. It ended up falling apart a couple of times but Zak worked it out in the end. Total spent for this frame was about $25. The bathroom looks so much prettier but it will look even better after I find a new wall cabinet and do some redecorating.


Mariposa made an appearance just as I was snapping a picture!


I highly recommend this project to anyone with a plain old bathroom mirror!

~Momma to Bug n' Bear~

Monday, February 16, 2009

Half Bathroom Bead Board Project

We decided to put bead board up in our half bathroom located on the main floor of the house. This was a fairly inexpensive project that took just one weekend to complete. Fortunately Home Depot sells kits trim and bead board kits that fit together like a glove. I am so pleased with the outcome!


We liked it so much that we decided to do the same thing in Arielle's tiny bathroom upstairs {I'll post those pictures once we replace the cracked toilet tank :-(}.


~Momma to Bug~