Showing posts with label Crafts. Show all posts

Tuesday, April 13, 2010

More fun with chalkboard paint


I have been looking for a little tree for Averi's bird theme nursery for quite a while. Nothing that I found was close enough to the "look" I was going for until this weekend when I was shopping the Kohl's clearance section. I found this tree on clearance for $4 and knew right away that it was perfect. I took a before picture {see below} but that was after I had removed the mini eggs that were hanging from it, which by the way are adorable so I saved them to be used on a future decorating craft.


The only thing that I didn't like about this tree was the color of the pot because it did not match Averi's room at all. Since I was already using the chalkboard spray paint for this project I figured I would paint the pot with it as well and it turned out great! It is the perfect addition to Averi's shelf.


I'm linked up to Just A Girl linky party! Check it out....


~Momma to Bug n' Bear~

"Magnetic" Chalkboard Project

I have been wanting to do another chalkboard project since I made a beach themed one for Arielle's room over a year ago. I still had leftover chalkboard spray paint and several more unused picture frames laying around the house so any project would have been a no or low cost to me.

Fortunately I found a cute "magnetic" picture frame on clearance at Hobby Lobby which only cost me about $3. The only part about the frame that I really liked was the pink magnetic piece that was screwed into the wooden frame {I forgot to take a picture of the picture frame before I took it apart}. So I got the idea to paint an 11" x 14" wooden frame, insert a chalkboard and glue the pink piece of metal to the middle of the chalkboard. After I painted the frame I wasn't happy with how the paint dried...it was really old paint and I think the frame a partial water damage. To fix this I simply sanded the paint down so the brown showed through. I liked how the distressing "aged" the frame but it needed more to make it look worn down. That's when I grabbed the screwdriver and paintbrush and began pounding away at it. The different sized dent marks gave it that final touch to make it look like it's been sitting around for years.
This project was so easy and serves two purposes...it holds magnets and you can write on it with chalk! I hung it up in Averi's nursery room above her Ikea hanging wall storage. I love how it turned out! Did you notice that I forgot to put the magnets on it before I took the pictures but you can use your imagination and pretend there is a little silver magnet holding up a note or a photo in the center.


I linked up to The Shabby Nest Frugal Friday linky party. Funny thing is that Wendy's post for the day was a pinboard that she created which was inspired by a "magnet" board from a store catalogue. I hope she likes my version of a magnet board.

~Momma to Bug n' Bear~

Tuesday, May 5, 2009

Glass Bead Magnets Project

First things first, thank you so much Chris for all of your inspiring posts about decorating and crafts. And for mentioning my name and doing a post about budget-friendly magnets at my request! I love your blog, Just A Girl!

Now, here are the glass bead magnets that I was able to whip up in just a matter of a couple of hours. They truly are inexpensive and easy to make but look like they cost a fortune! These make great gift ideas and with all of the leftover sheet metal that I have from making my magnet board, I'll be making some more little ones for presents as well. I plan on finding some picture frames to reuse at garage sales this summer!


~Momma to Bug~

Tuesday, April 28, 2009

Egg Carton Flowers


Since I work from home on Tuesday mornings, I have been trying to think of easy projects that Arielle can do while I work. One of my favorite blogs for craft ideas is The Crafy Crow so when I saw this post I just couldn't resist making the flowers. I had egg cartons saved up from Easter and found some random pipe cleaners left over from other craft kits so I didn't have to spend a penny! Instead of using paint, we used markers and even I joined in the fun. This was such a fun project to get the creative juices flowing. After we finished I found a small vase, stuffed some tissue paper in the bottom and VOILA! They turned out so cute I think I'll keep them around for decoration in my bedroom on my nightstand. What better way to wake up in the morning than to see these beautiful flowers that me and my daughter made together!
Here are the supplies we used:

It's easy. First you cut the egg carton up into "flowers". Next you color the flowers with markers. Then you poke a hole in the middle and insert the pipe cleaner. It really is that simple!

Hopefully every Tuesday we'll have a new craft to share!

~Momma to Bug~

Sunday, April 26, 2009

A Magnet Board Project

Now that I'm out of first trimester and feeling much, much better I am getting back into my creative mode. I have had this very large, silver frame sitting in the basement for the past year {since my bedroom makeover} as I was unable to sell it on craigslist. I was reading this post at one of my favorite blogs, I saw the picture of the magnet board in the background of the third picture so I thought what better way to reuse this beautiful frame! After contacting Chris and finding out how easy it was to make I just couldn't resist. Plus, I had been thinking about using this particular wall next to the kitchen to display Arielle's artwork since we were running out of space on the side of the stainless steel fridge.


Off to Lowe's we went in search of sheet metal which was the only thing I needed to buy to finish this project. We found that they sell precut sheets which are a heavier guage of metal and they cost more money than I wanted to spend {the size I would've needed cost over $28}. Fortunately, we found some lighter-weight sheet metal that they sell by the roll {20 inches by 10 feet; I needed 20 x 38 inches}. The roll only costs $13!!! My husband warned me there would likely be creases on the sides from being rolled up and he was right but they aren't that noticeable especially after you hang all the stuff on it. I struggled a bit to get the frame back together as it is a custom made frame and had to be completely disassembled then reassembled without the glass and with the sheet metal. I was able to pull it off and I am pleased with the end result!


To complete the look I am going to have to find some MATCHING black magnets. This will really give it that final touch and make it look more cohesive and less cluttered! Since I took the pictures, Arielle has added some more of her artwork and the hodge-podge of magnets doesn't appeal to me at all. Anybody know where I can find some good looking, affordable magnets?


~Momma to Bug~

Sunday, January 11, 2009

Letter M Project


I wanted to hang a letter "M" above our fireplace to fill the empty wall space that is in between the ceiling and the mantel accessories. I had seen the perfect framed letter "M" at Hobby Lobby but when I went back to purchase it they were out of the letter I wanted. This prompted me to make my own letter "M" which turned out to be a very simple project. I selected a distressed black oval frame, found a piece of scrapbook paper that I liked and a metal "M". The last thing I had to purchase was double-stick mounting tape and tie black gross-grain ribbon to the back of the frame and my project was complete for less than $15.

The nice thing about this project is that I can easily change the paper background anytime I want for different occassions, holidays or whenever the mood strikes me.

~Momma to Bug~

Tuesday, September 23, 2008

Play Dough


I found a recipe to make "Salt Dough" which turns out to be a great craft for little ones. The kiddos can help you make the dough by pouring and mixing the ingredients and the fun doesn't end there! After the dough is made, get their creative juices flowing by having them make shapes, animals, letters, jewelry, etc. {the possibilities are endless} out of the dough. After they are finished making their little creations, bake them in the oven then they can paint them! My three year old had HOURS of fun with this craft! Here is the ReCiPe:
  • Mix the following ingredients in a large bowl: 3 cups flour, 1 cup water, 1 cup salt, 2 tsp oil
  • After ingredients are blended, roll the dough into one BIG ball then place on cookie sheet

  • Spread it out with a rolling pin to about 1/2" thick

  • Use cookie cutters, forks, tupperware, milk jugs, etc. to make your own special creations

  • Bake on cookie sheet at 350 degrees for 30 minutes or until dough is hard. *NOTE: Dough does not rise but it does spread a little so don't overfill your cookie trays.

  • Let cool down for about an hour then paint, paint, paint!

Sunday, September 21, 2008

FUN Letters Project

Here is a FUN and extremely inexpensive project that anybody can do:

I purchased these wooden letters at Jo-Ann for 99 cents each (regular price-no coupon applied). They are approximately five inches tall by 2 inches wide so not big but not small either.
Next, I spray-painted them with leftover white paint that I had from another project. The finished look was boring so I decided to do a sponge up the paint while it was drying. That look right either so I just used the other side of the sponge (the scrubber part) and "sanded" them down for a rustic, weathered look. Some of the original wood started to show through but I actually like how they turned out. I even went so far as to hammer in a few of my own distress markings to further the aged affect. You can't even tell how the finished look turned out because the picture isn't that great.
To finish them off I chose a fun striped, gross-grain ribbon from my scrapbook supplies and attached it with thumb-tacks to the back of the letters. Seriously, this project only took me thirty minutes to complete from start to finish. It was well worth the $3 plus tax.
The letters are now hanging in Arielle's playroom. Originally when I thought of the project I wanted to spell the word PLAY but they were all out of A's so I had to think of another word and FUN was the first one that came to mind.

Wednesday, September 10, 2008

Old Frames, New Art

My latest decorating project was inspired by Arielle's first "real" drawing. I used quotation marks because she has made several drawings prior to this one but they didn't look remotely close to what she said they were supposed to be. The second I saw this drawing I couldn't even believe that Arielle drew it herself. Then when she told me that she drew a picture of Mommy & Daddy I literally got teary-eyed!


So I decided this picture was too good for the fridge so I checked out craigslist for some inexpensive frames and I scored BIG time! I got four matching, black frames with matting and two smaller ones for $30. There are a couple of dings here and there but since they are black I'll just color them in with a Sharpie and they'll be as good as new. The best thing about this project is that it's so easy to change out the art in the frame whenever Arielle creates a new masterpiece! I am going to hang the frames up in the loft above the new cube shelves which by the way I put side by side on the wall across from the loveseat and they now look like built-in-shelves.

Wednesday, August 27, 2008

A Chalkboard Project

After seeing this cute project made out of an old framed picture, spray paint and chalkboard paint, I decided I had to make my own. I had an old picture down in the basement that was just perfect to repurpose into a chalkboard for Arielle's room. I even found the wooden beach decorations on clearance at Hobby Lobby for just forty cents and I wasn't even looking! Check it out:

BEFORE:
AFTER:
IN ARIELLE'S ROOM:

I still have a large can of chalkboard spraypaint leftover...does anybody have any more easy ideas?

Sunday, August 24, 2008

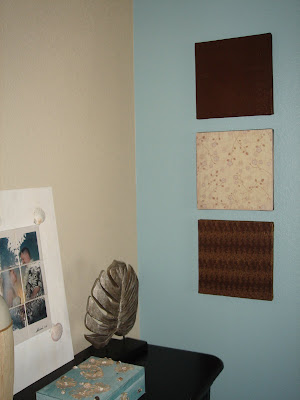
The Wall Squares Project

After seeing the wall square project for the first time here I became inspired to make my own. So off I went to Michael's for styrofoam {who knew how much this stuff actually costs...it's not expensive but certainly not worth what you get} and ribbon. My first attempt to make the wall squares with scrapbook paper on the front and ribbon on the sides failed. Neither one of them was sticking very well to the styrofoam so I had to think of something else. Fabric was the next best thing so I set off to JoAnn. There I found two coordinating brown fabrics with splashes of rust color which was a perfect match to my newly decorated bedroom. I actually ended up covering one of the squares in some leftover linen fabric but when I didn't like how it looked I glued paper on top and put the ribbon around the sides. It all stuck much better to the fabric than the styrofoam. I am amazed at how little effort it took to transform these materials into beautiful pieces of art! They are a perfect way to fill some wall space for not a lot of time and money.