Saturday, June 23, 2012

I {Heart} Frame Collage

I wish I could say that this heart frame collage was my original idea but I actually found it on Pintrest via theBerry.com and couldn't resist copying it!  I really love how it turned out and how well it fills the space in my new "Mom Cave".


I started this project by purchasing 4"x6" frames from Ikea for $2 each.  There are a total of 36 frames so it wasn't a cheap project but was the worth the money for a 5'x5' wall decor.  When I got home with my new frames the first thing I did was lay them out on the floor to see my vision and to measure the overall dimensions.


In order to have a starting point to hang the collage we taped a square on the wall the same size of the overall dimensions.  Then we made paper templates the same size of a frame to tape on the wall.  We also made one horizontal and one veritcal template to lay-over each paper in order to mark the nail hole on each one after they were taped up to the wall.  We started laying the templates out from the bottom working our way up as we went and making sure to level the templates out that were on the same line.  In the end we ended up with a shorter overall height than we originally layed out on the floor but it is because we decided to put the frames closer together.  Ultimately the collage ended up lower on the wall than we would have planned but it wasn't worth going through the hassle of rehanging all of the templates just to move it up six inches. 


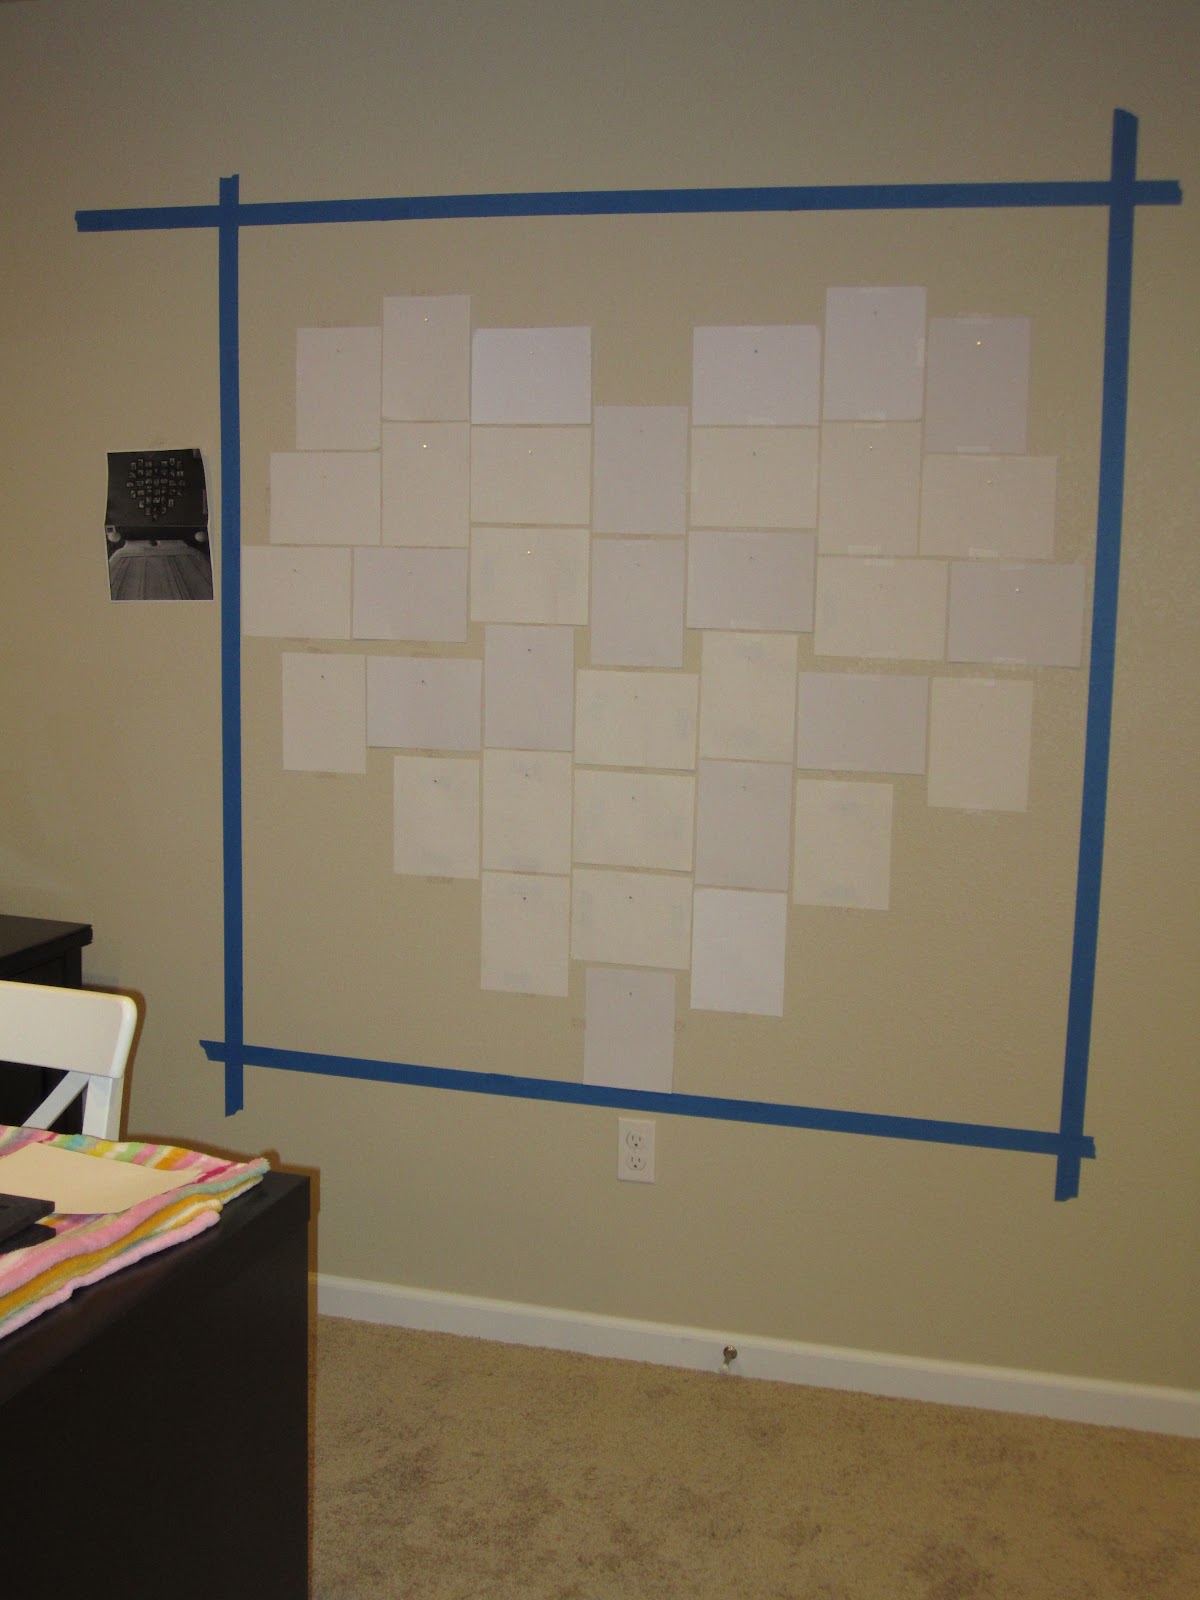
After we put all the nails in the wall I immediately tore down the paper.  In retrospect I should have left them up and taken them down as I hung the pictures because I had to refer to my inspiration photo to know if the pictures should go horizontal or vertical.  The good news is that we didn't have to make one single adjustment to our original layout as the frames fit like a glove!  Believe it or not, taking the frames out of the packaging, removing the backing to insert the photos and hanging the photos was actually more time consuming then hanging the templates and pounding the nails. 


If you decide to do this project make sure you have a handy-helper like I did!


Tuesday, May 15, 2012

Spring ~ Summer House To Do {List}

Here is a list of things I would like to do around the house before the summer is over and gone.  Some of them are quick, easy things but others are going to require more elbow grease.  I am looking forward to accomplishing all of them!

Blog more on recent room and furniture makoevers
Paint stripes or chevrons on the white side table in guest room, 
possibly white table in living room as well
Paint Arielle’s bookshelf green to match desk
Make wall of photos collage in craft room

Inspiration
Frame and paint peg board for craft room
Figure out what to hang next to striped curtains in game room
Redecorate office shelving and walls

Inspiration
Buy/paint a vanity for master bedroom
Make dog canvas for me and as a gift

Buy/make large hanging birdhouse for Averi's bedroom


Wednesday, May 9, 2012

Coral {Striped} Bathroom

I'm back and I've done a lot of redecorating in the past year so I have a few projects to show you!  The most recent project is my coral horizontal striped half bathroom. 

I looked at a lot of inspiration photos of rooms with horizontal stripes before deciding how wide I wanted the stripes to be, how many stripes I wanted and what colors I wanted to use.  My husband even called me a dork because I created an Excel spreadsheet with all of the options I had to choose from (I am a true accountant by heart!).  Laugh all you want but it really helped me visualize what effect the different choices had on me and which ones I was drawn to. 


 I ended up choosing an even number of stripes so that the top one was the same color as the ceiling which I thought would make the room look taller and therefore bigger.  Once I knew that I wanted an even number of stripes I narrowed down my choices to 6 or 8 stripes total then I divided the total length of the wall and divided it by both of my choices to determine how wide the stripes would be.  Visually, the smaller stripes didn't appeal to me since it looked cluttered or too busy.  So my choice was made and the stripes ended up being 9.25" inches wide.


Coral was my first choice of color.  The only question was dark or light coral.  I ended up choosing dark since I was using white as my other color.  I wanted a dramatic effect with these stripes and the color choice did just that!  The color that I used was "Tropical Bloom" by Valspar Signature.


I started by painting the entire wall and ceiling white (it's actually called "Whister White" by Glidden and it's the same color as the beadboard and trim).  We waited 24 hours for the paint to dry then my husband made a template to measure the stripes approximately every two feet over the entire wall.  Next he connected the dots he made from his templates with lines using a pencil and metal yard stick.  Then he taped the lines using Scotch Delicate Painters Tape with Edgeguard since we had only waited 24 hours for the paint to dry.  Lastly but most importantly, he applied white caulk along the edges of the tape to ensure that the paint would not bleed over the edge of the tape.  It worked like a charm!


When we finished painting (sometime during the day) and pulled the tape off the color looked perfect...just like I envisioned it in my mind!  Later that night after the sun went down my husband hung the light fixture up and after he turned the light on my heart sunk.  The color looked like bright orange in the artifical light and I was not happy about it at all.  Fortunately my {smart} husband suggested that we buy  day light high efficiency bulbs to see if that changed the appearance of the room.  Let me tell you, it was worth the extra money for these bulbs because the orange went away and the coral reappeared!


This half bathroom is now bright, cheery and tropical!!! 

Linked to:

The Shabby Nest ~ Frugal Friday
The Shabby Creek Cottage ~ {Transformation Thursday No. 151}