Showing posts with label Organizing. Show all posts

Wednesday, August 11, 2010

Playroom {Craft} Area & Storage

Finding motivation this summer has been a little difficult and I haven't accomplished much in the way of decorating projects. So it makes me very happy that the playroom shelves are finished and we have a new craft table for Arielle. Looking at the pictures that I took of the shelves made me realize how badly I need to decorate the playroom, especially the new "craft section". I feel as though I am working with a blank canvas and have a ton of ideas floating through my head for all of this empty wall and shelf space.

Here is a BEFORE picture of the area in our playroom before we built the shelves:


Here is the after pictures with new shelves and craft table:


The fabric bins are concealing a lot of craft supplies and are perfect for the shelves because they have handles that will make it easier for Arielle to get them down. Since the shelf that they are on is a bit taller than her and she can't see inside them I am going to put some labels on the bins. It's so nice to be able to do that now that she is reading like a pro! I think I am going to steal JAG's idea so they should look similar to this when I am done {in fact I am going to email her right now to find out where she buys those circle things to make the labels}.


We purchased the table on craigslist for $35 and cut the legs down to a reasonable height for Arielle, keeping in mind that she is growing like a weed! I would love to paint the table white but I know it's going to get dirty so I don't think that would be a good time investment. I didn't intend to use the toy box bench as seating but since we decided to keep the table on the taller side our existing chairs a bit too short as you can see from the picture. The bench ended up being the perfect height and it provides additional storage, it just takes up a bigger footprint on the floor than regular chairs.


Here is a list of the supplies that we purchased to make the shelves including costs:

-3 six foot long primed MDF boards ($10 each)

-5 sets of two decorative metal brackets ($10.50 each)

-1 quart of Behr "February Frost" {purple} paint ($12)


In retrospect we could have saved money by purchasing a sample size of the purple paint but hopefully we can find a use for the leftovers and since we already had the pink paint that saved us a little. The total spent for three 5 foot shelves was about $95.

Check out this cute dry erase board that I got at a garage sale for $5! We hung it up in the playroom this weekend next to Arielle's kitchen playset {which she has totally outgrown} and she wrote this sign:


All Linked Up:

Today's Creative Blog...Get Your Craft on Tuesdays
The Shabby Chic Cottage...Transformation Thursdays
The Shabby Nest...Frugal Friday
Organize & Decorate Everything...We're Organized Wednesdays

~Momma to Bug n' Bear~

Monday, June 14, 2010

Laundry Room Makeover & {Storage} Tips

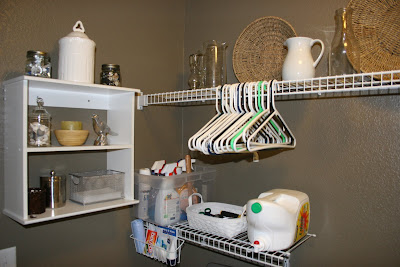
I have {nearly} completed our laundry room makeover. Aside from hanging a couple of things up on the wall {more about that later} there is not much else I can do to finish this space. The room is actually a large hallway closet and it is small. I didn't change much from the previous layout other than painting the walls, adding accessories & storage and rearranging some stuff on the walls that was already in there. This room now has plenty of storage for everyday household items such as cleaning supplies, sewing notions, hardware and tools. If you take a close look you'll see storage containers just about everywhere in all shapes and sizes, some of which are pretty and some are plain but either way they serve their purpose. Everything I used I already had except the paint so the total cost was about $25.

The paint color is called "Mocha Accent" by Behr. I wouldn't recommend using it in an entire room because it is rather dark but that is the look I wanted for our laundry room. I figured since it really is a closet and closets are usually dark I wanted it to stay that way to some degree and not stick out of our house like a sore thumb. All of the white from the appliances to the shelving really tones down the darkness as well which I was counting on.

Here are a couple of before pictures of the laundry room without appliances:


Here are the after photos and a breakdown the changes that I made.

The new washer and dryer, although with increased capacity from our old ones, are much smaller so I was able to fit a 3 drawer organizer on the floor next to the dryer. This is great for additional storage of large items such as humidifier filters which is what I have in there right now. On top of that I found a large, heavy duty wire basket at Goodwill for a whopping one dollar and I loaded it up with toilet paper rolls. We buy these from Costco so we get a million at a time {too many to fit all under the bathroom cabinets}.


I rehung my little white shelf on the other side of the room where there was additional space. On top of it I added two cute, little matching mason jars; one holds screws & nails the other holds buttons. Between those is a beautiful white jar that contains various light bulbs. The shelf below that contains some pretty accessories for now until I need additional storage. The bottom shelf holds a silver, metal mesh container with dryer sheets, a brown beaded candler holder with chalk and a shiny silver container with random hardware. I might hang a hook rack below this shelving unit if I find I need to hang stuff up but for now I don't have a use for one. It's good to know that there is ways to add different kinds of storage if need be.


I filled up the white wire shelving that runs the entire width of the room with a combination of glass and white accessories as well as round shallow baskets resting against the wall. I also added two photo boxes filled with sewing supplies that fit perfectly in the corner. Although this type of shelving isn't very eye-catching I opted to keep it instead of replacing it because it was no cost and I need it to hang clothes that are drying. At some point I may purchase or make my own wood shelving and hang a curtain or shower rod but right now this was much more feasible for now.


The shorter white wire shelf above the dryer contains a plastic bin that holds lots of cleaning supplies. Again, not very pretty but functional and I know the items are out of reach of little hands which was my goal. Storing these items here is a good thing because it means I don't have to store them under bathroom cabinets and bother with childproofing them. I have been looking for something else to use instead of a clear plastic container like a basket or colorful tote but so far no luck. I use these 19 quart clear plastic containers everywhere in my house because they are so versatile and cheap {$4 at Wal-Mart}. I use them to store seasonal items, baby stuff, kids cups, cleaning supplies, blankets, undergarments...you name it and they'll hold it and fit practically anywhere! This shelf also contains a basket with basic tools that are mostly used for hanging stuff. I already had this basket and it was not being used so at some point I may swap it out if I find one that is more suitable for the space and function. And of course this is where I keep the large container of laundry detergent {also purchased from Costco which explains why it is so big}. I love the idea of storing powder laundry detergent in glass jars but I have always preferred liquid detergent so no such luck!


On top of the dryer I put a small plastic container to put things in that I find when I am doing the laundry. This keeps these items from rolling onto the floor before I have a chance to put them where they really belong. I also have a round glass candle holder sitting under the laundry detergent dispenser which is also where I put my soap cup so there is no mess to clean up. I also have a plastic mat covering the top of the dryer to avoid dings and scratches.


The hanging iron and ironing board organizer serves its purpose as well and I'm glad I was able to put it where the board can rest between the wall and the washer so it's out of the way. Before we hung it up there were did a test run to make sure I could get it in and out of the closet.

I am going to make a chalkboard to hang in this space so I can make notes or leave messages. I think a chalkboard hanging by a ribbon from a silver decorative knob would look great! I will also hang my clock as soon as I decide where the chalkboard will go.

For now the space is a big improvement from before and I am happy that this project fell into my lap, even if we did have to buy brand new appliances! If only I could find a way to organize my kitchen and pantry this well.

All Linked Up:
Today's Creative Blog...Get Your Craft on Tuesday
Just A Girl...Show and Share Day
The Shabby Chic Cottage...Transformation Thursday
Just Alice...Laundry Room Party
Organize and Decorate Everything...We're Organized Wednesday

~Momma to Bug n' Bear~

Monday, January 19, 2009

TIP: Organization for Countertops

I have a great tip for organizing the countertops in your kitchen, bedroom or laundry room. This is especially helfpul if you run out of room in your junk cabinets and drawers or have you stuff that is too big for either of those places. I also think this is the perfect way to store stuff that you need to be able to grab easily on a daily basis because it saves your cabinets and drawers from getting dirty or worn from over-use.
Here's what you do:
Go to office supplies section of any store and buy a couple of these metal, rectangular-shaped containers {I think their main purpose is to store cd's}. Then add a couple of magnets and/or magnetic clips {binder clips work too}.


Find an empty section of countertop and place the container against the wall, then fill it up!
I use mine to store sunscreen, lotion, windex, bubbles, tissues, notepads, Netflix movies...the possibilities are endless.

Use the magnets and clips to hang up recipes, coupons, photos, notes, receipts, etc. {this is my favorite part}!

Finally, if you are worried about your counters looking "junky" because you are expecting guests, showing your home, etc. all you have to do is pick the container up {with all of it's contents in place} and store it under the kitchen sink for a day!

This really is the perfect solution for organizing your countertops and de-cluttering!


~Momma to Bug~